Good Morning!
Thank you so much for joining me! I am so honored to be a part of such a talented group of teachers and students.
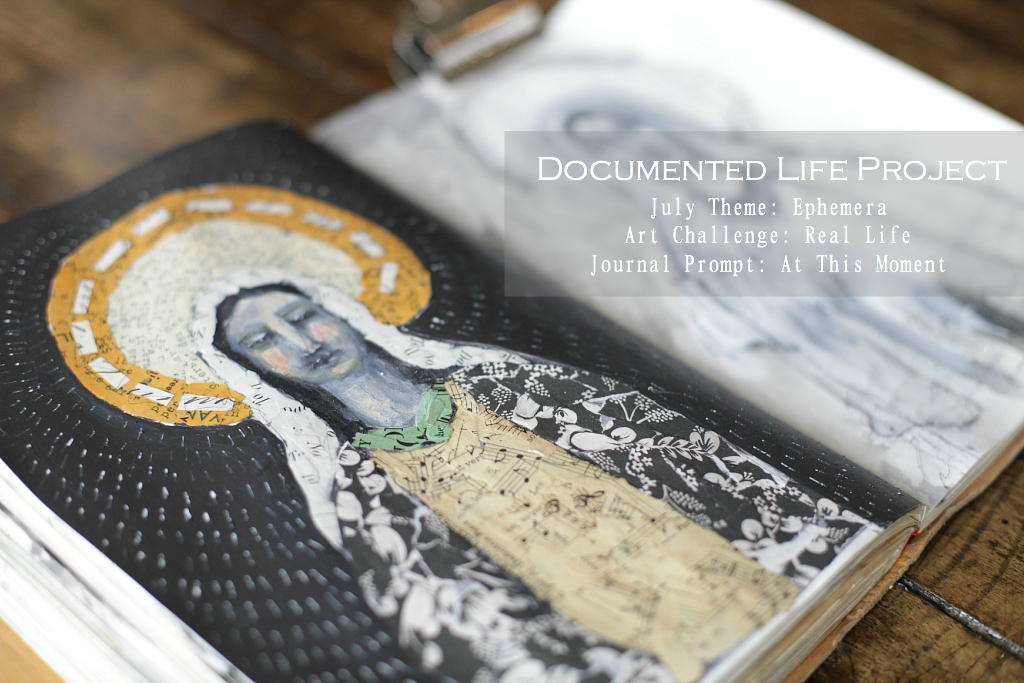
I am excited to be the featured artist for the Documented Life Project and today I am sharing my videos!
I have just returned from teaching in Italy and one of the classes I taught I thought would be perfect for this challenge.
I adore vintage ephemera and it is really the main thing I purchase during my travels and I cherish every little scrap.
There is something dreamy about the texture and patina of vintage papers and it is a beautiful way to reuse gorgeous colors, text and penmanship of the past.
Before we get started I wanted to share a little tip about journaling and introduce myself…
Let me introduce myself!
{With Jeanne Oliver}
Documented Life Project Art Video {Ephemera} PART ONE
{With Jeanne Oliver}
Documented Life Project Art Video {Ephemera} PART TWO
{With Jeanne Oliver}
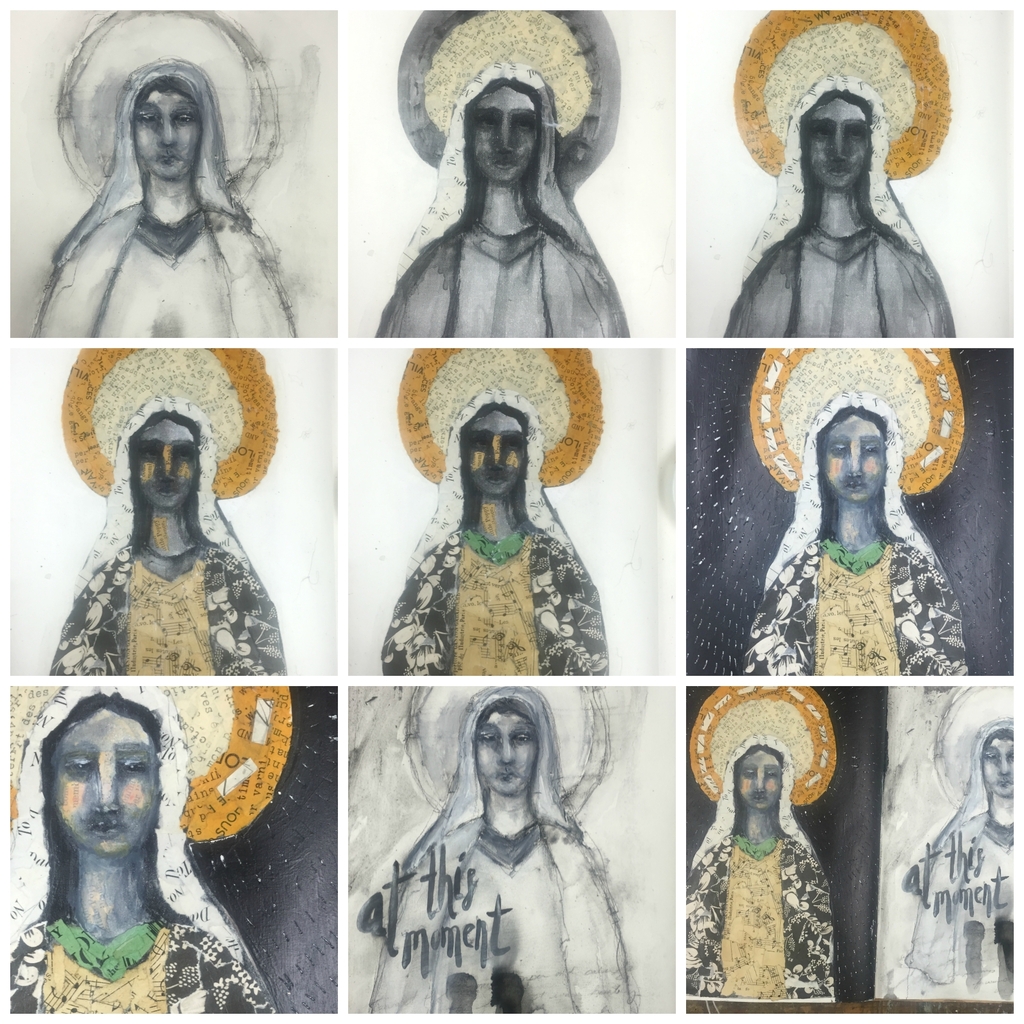
Step by Step Instructions
1. Cover your substrate with clear gesso and let dry
2. Sketch with your charcoal pencil, damp paintbrush and white gesso. Add Stabilo as needed. Just have fun and experiment with these mediums as you move them around with the water.
3. Once your sketch is dry you can begin adding your torn vintage papers with Liquitex Matte Medium. Make sure you put the matte medium on your paper and seal with the matte medium.
4. Add a few pieces of vintage book pages to the neck and face following the steps in #3.
5. Paint the background and while it is wet mark into it with the back of your paintbrush or if it has dried mark into it with your exacto knife.
6. Mix a basic skin tone with titanium white, yellow ochre and crimson. Add neo color II to the face to create more depth. I like payne’s grey, yellow ochre, crimson and flesh. These move around beautifully with just a bit of water. If you add too much don’t worry and just lift off with a dry rag or wet wipe. Dry between each layer to prevent your colors turning into brown. I always think a little extra white paint (or white gesso) above the eyes at the end makes a face more interesting. Remember that less detail is definitely more. Experiment with letting your brain pull the pieces together and not feeling like every little detail of the face needs to be included.
7. A few tips to remember: hold your brush back and loose, let go of the details, turn the music up and just have fun:-)
Original Image
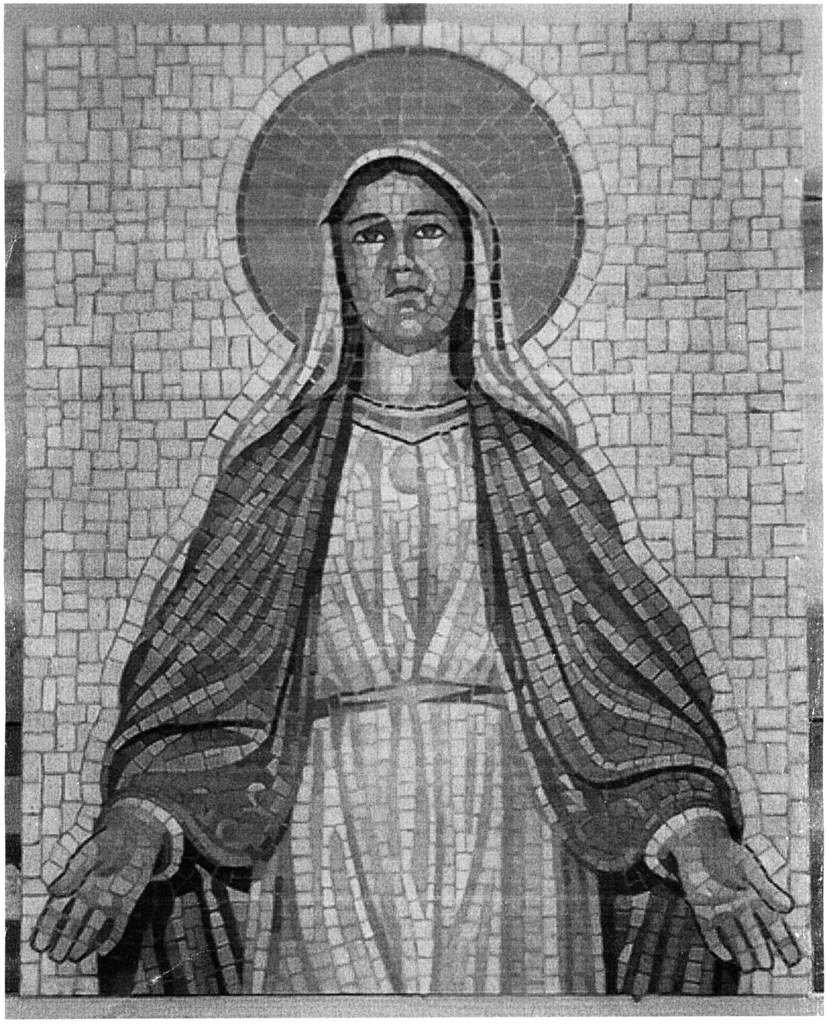
Jeanne Oliver Copyrighted Image-This is for personal use and practice only
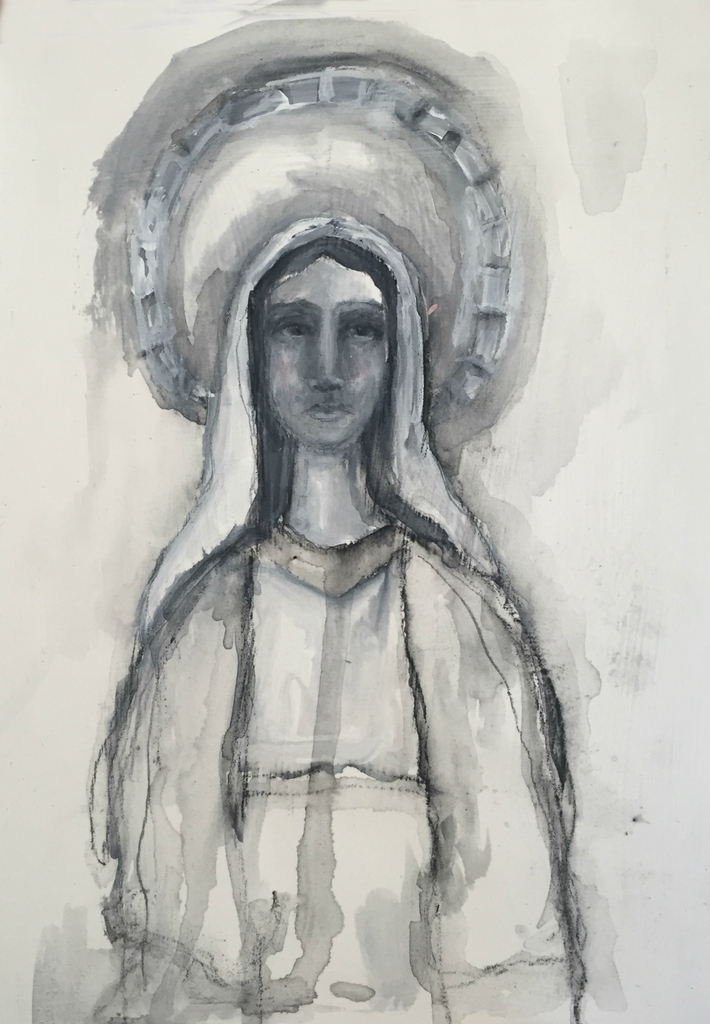
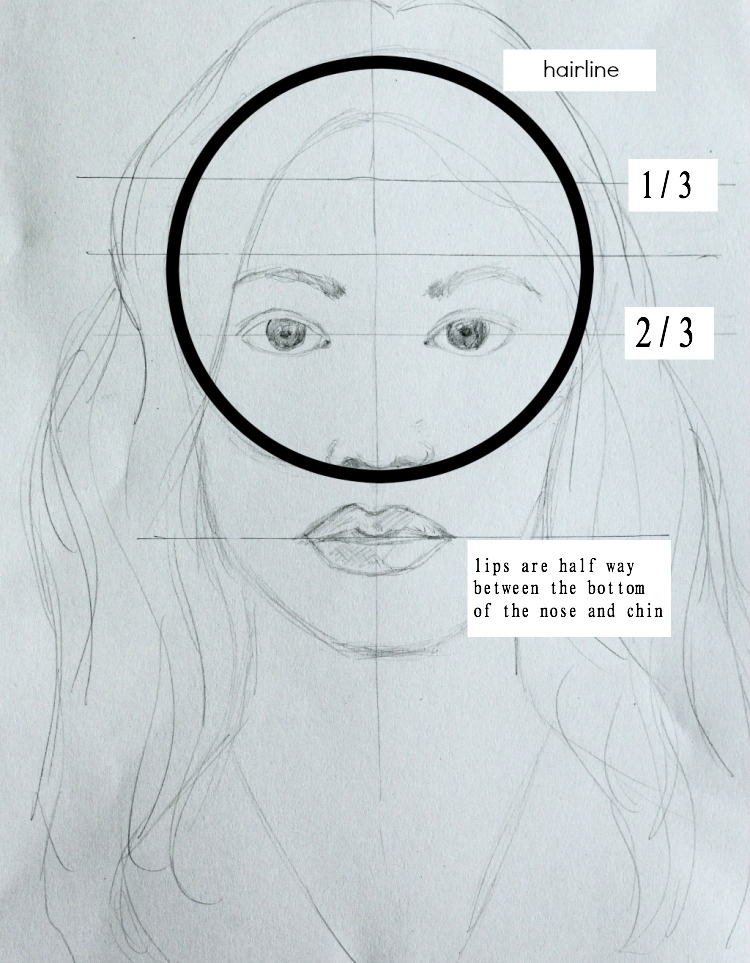
Breakdown of the Face Image
Tools
* #4 Round Long Handled Paintbrush
* Mechanical Pencil
* Paint (background color, Titanium White, Yellow Ochre and Crimson}
* Neocolor II (payne’s grey, white, yellow ochre, crimson, flesh}
* Vintage Ephemera

Thank you so much for the amazing team at The Documented Life Project for asking me to be a part of your series!
I would love to have you check out my creative network with over 40 beautiful online courses!
If you are new to our creative network here are easy steps to get you started…
1. Register at jeanneoliver.ning.com (this is free).
2. Once your account is active you are able to take advantage of our free courses, series and even pay for courses.
3. Go to jeanneoliver.ning.com and along the top header click on “COURSES” and you will be able to view all three pages of online courses and free series.
4. To purchase a course please choose your course, click on the +join in the upper right hand corner, pay and you will be INSTANTLY in the classroom.
5. All videos can be found along the right hand side of the page under “COURSE CONTENT”.
Thank you so much for these truly inspiring videos. You make me want to go IMMEDIATELY and get my journal and start working on this. Beautiful journal!
Thank you so much! That is exactly what I would have hoped for!
Absolutely beautiful, Jeanne!!! Thank you for always inspiring me. Blessings to you!
Thank you so much for watching!
Jeanne, I love how you are such a great presence in our lives:) Every course I’ve taken from you has given so much to my growth as artist and person…thank you so much for everything you do! Can’t wait to give this a go!
What kinds words! Thank you. Please share what you create.
What an inspiring project, it would never have occurred to me to try and do a project in this manner, I Love it ! thank you for sharing your beautiful talent!!
Thank you! That is awesome and I hope you share your work.
Jeanne- Thank you so much for being our Featured Artist this week! What a gorgeous piece you have created. Thank you for all the hard work you put into this offering. I know our members are going to love it!!
Sandi, thank you so much for the invitation and the opportunity to create with all of you!
That’s exactly what I want to do!!! Start doing some journal work right now!! Truly inspiring and has my creative juices flowing for some reason. It’s instigated a myriad of projects in my head I can’t wait to start!!! Thank you gorgeous xx
That makes me so happy! Please share!
Thank you so very much for these inspiring and free lessons! I enjoyed “Studying under the masters” last year (your leesons about van Gogh were awesome).
Thank you so much! I loved studying under Van Gogh and learned so much myself.
Thank you so much for sharing this with us.
Thank you for watching!
You always inspire me, Jeanne, and you make me want to go try things I never have. And I LOVE that I now have some meaty videos to watch today! Can’t wait to see how you created your beautiful piece above.
Thank you and that is the nicest compliment.
Thank you for sharing such a detailed process! I learned so much and loved listening to your voice!
Thank you!
Wow. Like usual your generosity and kind spirt has shown us great artwork. Your so appreciated, can’t wait to start.
I loved creating it for DLP and honored to be a part of the series.
Thank you so much Jeanne, your art is amazing and inspiring. You are so generous with your techniques and I love the imperfections, they give art more character where a ‘perfect’ piece although can of course be lovely but not nearly as interesting.THANK YOU!!!
spending this new morning with you- listening to your heart, basking in your generosity, receiving your guidance is a true blessing of love and creativity. thank you jeanne for your ability to infuse kindness and heartfelt beauty in the world around you. you are a gift that lifts hearts; certainly you have lifted mine.
After all of these beautiful comments I think I am just going to put art videos up for the rest of my life:-)
This is amazing! Thank you so much for being one of our guest artists – your work truly inspires! You were so generous to share such wonderful tips, images and videos! WOW! What a stellar week! I can’t wait to try out some of your pointers and create a figure even half as lovely! Thank you again and Happy Creating!
Thank you! I love your work too! I hope you share what you make and thank you for including me. I have mentioned earlier but you all have created a wonderful series!
Jeanne – you have the sweetest way about you. You make me feel like I can do it. Practice has been my mantra lately – I have been practicing yoga, practicing meditation and practicing art. I so often feel that I cannot do art or that I will never be as good as I would like but then I remind myself that I must practice. You have just reinforced this for me so thank you for this lovely message. I am glad I found you 🙂
Tami xoxo
Practice has made all of the difference for me and I look forward to a lifetime of practicing!
Thank you so much for sharing this with us! While I was watching your videos I sketched a little in my small sketchbook and you gave me such a calm relaxed feeling for my weekend. You are so inspiring to watch and I can’t wait to explore more on your blog! Thanks against much for sharing with us!
That makes me so happy to hear that! Sketching has become such a relaxing activity for me.
Wow, such a big inspiration! Thank You so much! So gonna try this!
Thank you and please share what you create! I would really love that.
I loved every minute of it. Can’t wait to try the collage technique on a day that I am patient with myself. Thank you so much for sharing your talent.
Just turn the music up and have fun. The time will go quickly and I find it really relaxing. Let me know what you think.
Thank you for sharing so much with all of us. I now hope I will get out my sketchbook and draw (well attempt anyway). Very inspiring videos Jeanne!
I hope you do too! Thank you so much.
Jeanne, I thoroughly enjoyed your videos for this week’s DLP. You always put so much into anything you create online. I love watching you work. You have been an inspiration to me for a very long time. Thank you for sharing these great pages with us. I cannot wait to try your ideas in my journal, too!
Jane, thank you so much and thank you for being a part of my online courses!
Jeanne, I am completely in love with the collage madonna! I enjoyed so much watching your wonderful selections of paper/design for each section. Seeing it come together has been a great treat! These video/demonstrations are wonderful! Thank you so very much. Also thank you for your insightful words. Love to you!
Thank you so much! I love watching artists work too and I am so thrilled that you enjoyed the videos.
Jeanne, You are so dedicated and focused in what you achieve. Thank you for sharing the abundance of information you gathered on your trip to Italy, and your already experienced knowledge with using charcoal, gesso, and the water brush. You certainly have simplified things for those of us who are viewing your instructional videos. What marvelous techniques to achieve such stunning works of art!
Thanks ever so much for your creative guidance and these well-thought-out videos.
Again, you are so blessed from our Heavenly Father.
Teresa in California
http://amagicalwhimsy.blogspot.com/
You are so kind! Thank you and I love so much that the steps were clear and hopefully you will give them a try. Please share if you do.
This is beautiful Jeanne…and I highly recommend your classes that you offer…free and pay for…they are all amazing and full of so much LOVE… 🙂
That means so much to me! Thank you!
This was my first time using the charcoal and stabilo in sketching and I LOVED it!! I will finish up what I did and post on FB tomorrow! Thank you soooooo much for this fabulous lesson!!
Thank you. Love the videos.
I love that you dove right in and tried it! Can’t wait to see.
Amazing! I loved the entire process amd how it turned out. Thank you so much for sharing with us.
Thank you so much! Thank you for watching!
Thanks for a great Class. I just loved it. I don’t have a charcoal pencil yet, but I will get one as soon as possible 🙂
I forgot to mention, that you can see my version here: http://mindart.dk/blogs/madonna
So stunning! Thank you so much for sharing!
Jeanne, this was beautiful! What was the music playing in the background?
I will try to find it for you. Please email me at contact@jeanneoliverdesigns.com about it and then I won’t forget:-)
Thoroughly enjoyed the video and techniques you shared…such an inspiration. Hoping to give much of this a try.
Thank you so much and for taking the time to let me know.
Jeanne, thank you for the inspiring art and inspiring words. Especially the part about slowing down and allowing ourselves to be present in the midst of our wonderfully chaotic lives. I hope you find a quiet moment in the next few days to close your eyes and breathe. 😉
Thank you! One of my closest friends in the world is visiting tomorrow with her two boys so we will have lots of quiet and fun moments.
Thank you for this inspiring lesson. I’m excited to give it a try. I love your approach and calm style when you create. I will definitely be checking out some of your online classes!
Thank you! I would love for you to check out the online courses. If you have any questions about them please email me at contact@jeanneoliverdesigns.com
Thank you, Jeanne. I am a fairly new subscriber and really enjoyed watching you work. I love the simplicity of your process and appreciate your personal thoughts. It means a lot to me, especially as a teacher myself, that you include ‘yourself’ in your instruction.
Thank you! What a nice view of my work and teaching.
Thank you Jeanne for this beautiful art and your lesson! I am so excited to try this with all the vintage papers I have collected. I love your technique using the charcoal pencil and stabilo with gesso it is simple yet vey impactful. Your work is inspiring on so many levels <3 I also loved the music in the background 🙂
Thank you so much!
Lovely, lovely! Enjoyed this so much. Thank you, you are an inspiration.
Thank you! Please share your own work!
I had so much fun trying to do my own thing with the madonna challenge. It is so relaxing to just play! Thanks for the inspiration and the great instructional videos. Really awesome! (I’m going to attempt to post my collage on Facebook. Not sure I know how!)
Please tag me so I see!
Jeanne, I thoroughly enjoyed and benefited from your lovely videos and art process. Thank you for taking the time to include so many helpful details and encouraging us to make our journals our own and not to stress over using a lot of materials. I can see how using a few materials has both inspired you and made your work rich and stunning! Your videos were like a complementary class for me. So glad you were a DLP special guest. Best wishes!
What a gorgeous project- love your techniques. Thank you for being so generous sharing them with us. Your lesson is so thoroughly enjoyable- I will attempt it over the weekend! I love the background shade, that blue/grey – can you share the name of the shade please. Thank you again!
Oh, Jeanne! This is was so generous of you and wow! I learned so much and love the ease with which your create. It was a pleasure having you join us for The Documented Life Project…thanks so very much for saying, YES! Blessings to you and your family! 🙂
Thank you, thank you, Jeanne for this wonderful class and for reminding us that we can get by with so little in the art supply department. My Madonna resides at: http://mtcart.blogspot.com
Hi Jeanne, I would really like to look at your videos especially as they come so highly recommended but I am having problems playing them, I use a Mac, have registered with your site and that didnt help 🙁 Are they time limited? I am a bit behind with my DLP work. Many thanks Nick
Nick, the DLP videos have been playing fine as far as I know. Please make sure that you do not have other programs running at the same time because these videos are HD. You can always click the HD off on the videos too if your connection is slower. Thanks!
This is so wonderful! Thank you for taking the time to make such an awesome and informative piece for the Documented Life Project. I watched the videos with my daughter, she is 10 years old, and she can’t wait to have a go at doing this with me. You reminded me also about getting back to basics, thank you so much. I have felt a little stuck in the last few weeks with so much going on in my life. I was so inspired after watching this, I just had to go and make pictures. Thank you Thank you Thank you.
Thank you Jeanne, for extremely generous instructions, I enjoyed working along with you, although I did a much bigger lady than yours, it was still based on your example.
Jeanne, I have a question regarding your journal in this project. Are you using a sketchbook or a mixed media or watercolor journal for this project? Thanks for sharing your life and art. Your spirit is so telling of the presence of God in your life.
I am using a mixed media sketchbook with clear gesso before I begin. Thank you for your kind words! I hope this helps.