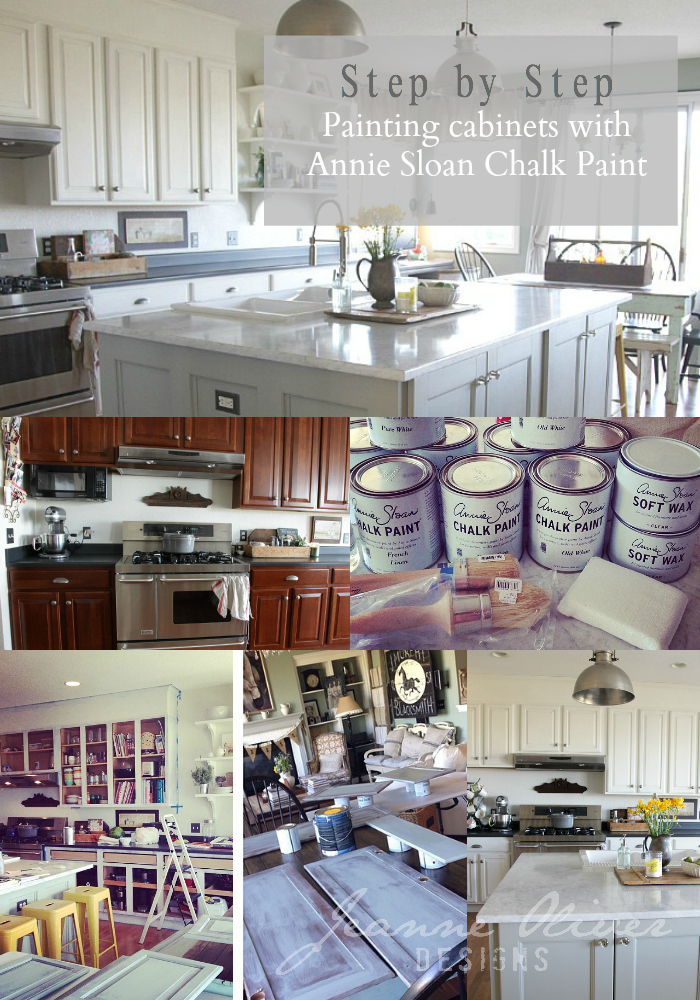
One of the questions I get asked the most is regarding how I painted our kitchen cabinets and what do I think of Annie Sloan Chalk Paint.
I have waited until now to share my opinion because I thought we needed to really live with the cabinets to see how they wore with daily use and to give me time to give an honest opinion.
Before we start let me be honest that if I had contacted many people to come and give us quotes to paint the cabinets. I have the worst track record of getting contractors to either show up or get back to me with quotes. I did NOT want to do this job. Not even kidding. I really tried to find someone else but I didn’t have any luck and that is when I decided that the only way I could do this was by using Annie Sloan Chalk Paint (ASCP).
The reason I had the guts to undertake such a huge project was because with ASCP I wouldn’t have to sand all of the cabinets. Maybe a silly reason but it was the one thing that really helped me to feel like I could do this.
I am a hugely externally motivated person and the main reason I had the motivation to FINALLY get this project started was because Fifi O’Neill and her crew were coming to photograph our home for different magazines. They were arriving just days before I was leaving last summer to teach in Italy and I had some huge time constraints to get this job done.
Before we started the project we first met up with the owners of Shades of Amber and they gave us private lessons to put both Kelly and me at ease. They gave us such confidence and shared exactly what we needed to start. I am so grateful for their kindness and patience with us!
So, first I will share all of the step by step instructions and then at the end give you my honest opinion about our cabinets and if I would do it again.
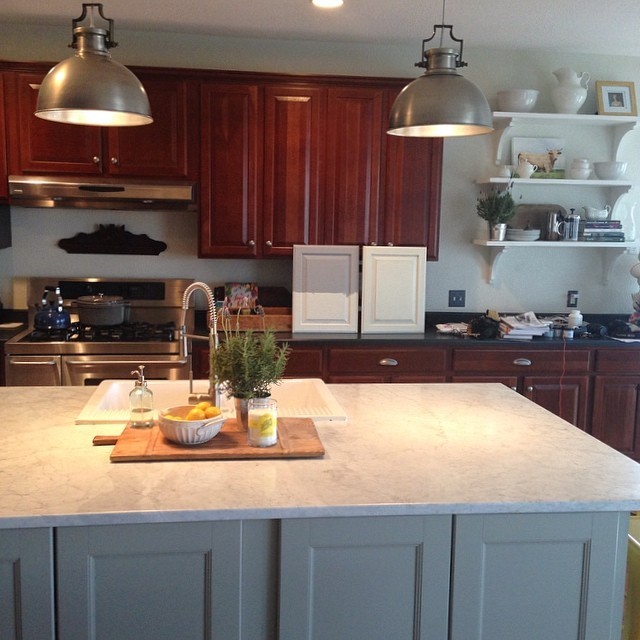
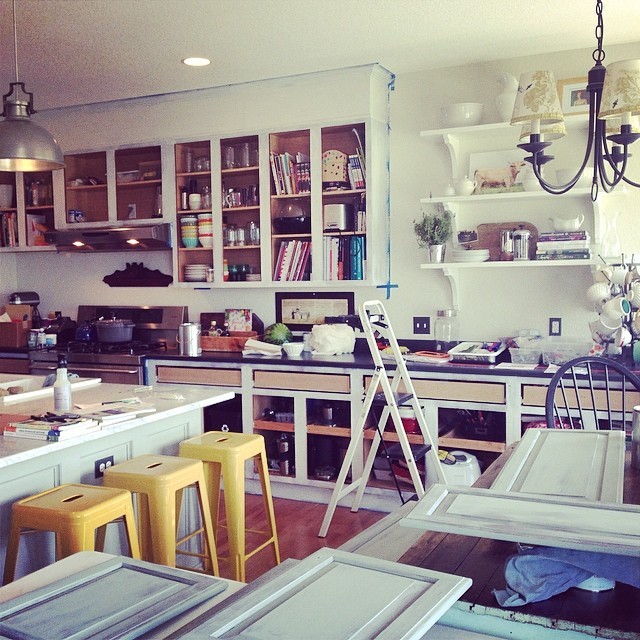
Trying to figure out what colors to go with.
(Sorry for the dark photos but most photos were just on my phone. Without these I wouldn’t have taken many progress photos.)
Step One:
Wipe down all of the cabinets using Krud Ktter. This is to make sure you don’t have grease and oils on the cabinets before you paint. Don’t skip this step. I did this while they were still on the hinges and hanging to make it easier.
Step Two:
Take all of the doors and hardware off the cabinets. Make sure you are careful in how you organize and save the hardware to make it easier when it is time to put it all back together.
Step Three:
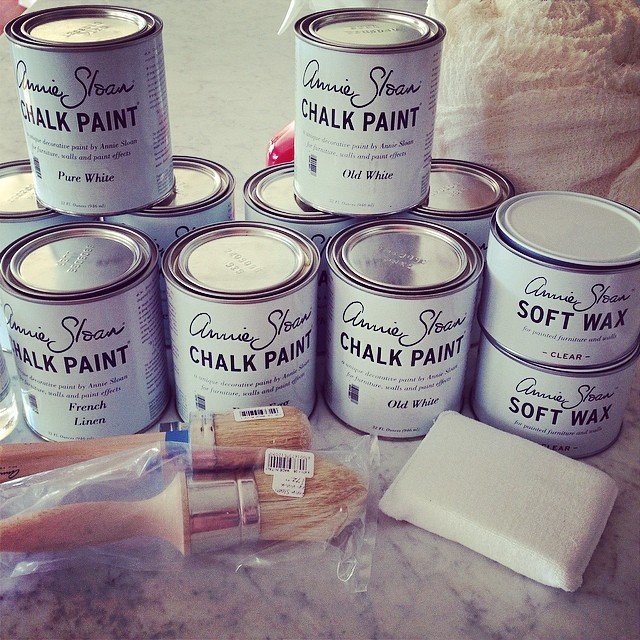
I bought the two sizes of ASCP paint brushes and I am glad I did. I ended up mostly using the smaller one though. Before you start I would recommend flipping through the brush a few times to get rid of loose bristles. Make sure you shake the can well (in our case we mixed one part Old White with one part Pure White). You may not believe me until you do this but the best thing to do at this point is to just dive in. The paint is forgiving and even though the first coat may have you freaking out…the second coat will make you start seeing where this project is going. We started with the cabinets (Who am I kidding? I started with the cabinets) and did the doors last.
I waited until each coat was dry before I added another coat. I ended up doing three coats to everything and I think I should have done four. Without our deadline I know I would have done that. I was so sick and tired of painting and I just wanted it to be done. Don’t do this. Don’t skimp during the process because you will regret it later.
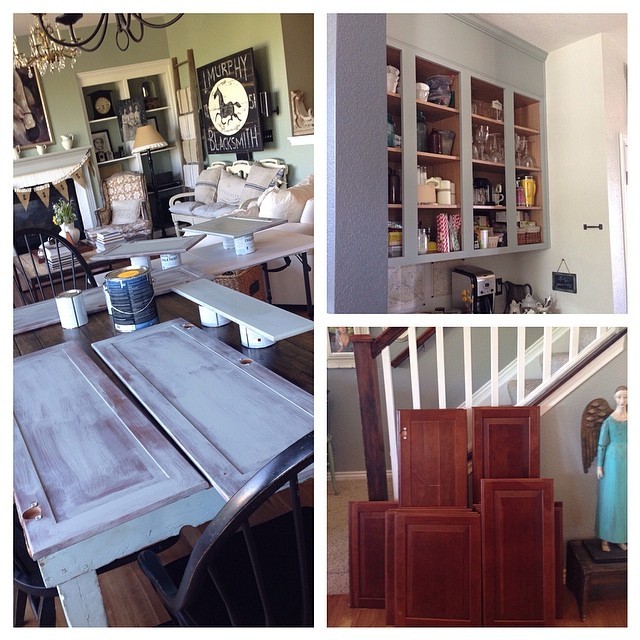
Step Four:
Once your surface is painted you can choose to age the wood a bit with 120 grit sandpaper. I wasn’t sure if I would do this or not but because of the shape of our cabinets, it actually looked good. Keep in mind that we have three kids and they were going to do it anyways with daily use and it makes the new marks just look like part of the charm.
I used the 120 grit sandpaper on the edges only and never on a flat surface.
Step Five:
At this point, we put the whole kitchen back together before I waxed all of the cabinets and doors. I think it made the process easier but that is a personal preference. We used the ASCP clear wax and I LOVED it! I have used it on so many other things since (including my art). To apply the wax I recommend working in small sections (2 ft x 2 ft sections). I also recommend purchasing the wax brush because it is just so nice and makes the process easier. You dip the tip of the brush into the clear wax (dark wax too if that is your thing) and in circular motions you get into all of the nooks and crannies of your piece. You then take rymplecloth (cheesecloth) and wipe the excess wax off. Your cabinets and doors should not be gooped with wax. This is a sealer and you want to treat it as such. Using the wax is gorgeous! It not only seals your cabinets but also gives is an awesome matte appearance. After 24 hours you can add a second coat. I have to be honest that we still have to add our second coat (more about that later).
Step Six:
Buff the wax if you want a sheen.
Those are the nuts and bolts and now to the raw truth about the whole process, what we think as a family and would I do it again.
The process is the biggest pain in the butt! Serious! So much work and it is easy to start to rush things because you just WANT TO BE DONE. I have heard people say that they just broke it down over months to make it not as bad. No way! I wanted this done and I wanted my kitchen back together. That is so not my style. That being said…I should have done that forth coat. It is not something that anyone else has commented on and my husband doesn’t know what I am talking about but I see it. After 10 months I have to tell you that except for the cabinets where the garbage and recycle cans are…they have held up AWESOME. I have some touching up to do on a few cabinets but not anything that will take me too long. To do a touch up after you waxed just use the ASCP mineral spirits to take up the wax, touch up, let dry, re-wax. Not too tough. I am planning on doing the touch up within the next few months and also finally get that second coat of wax on the whole thing.
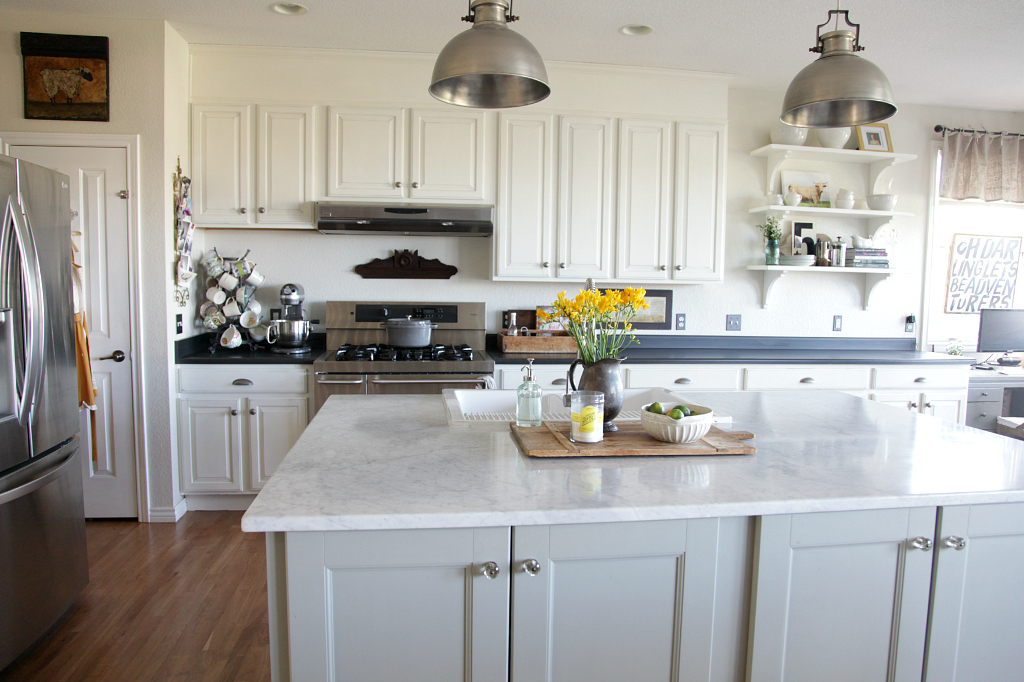
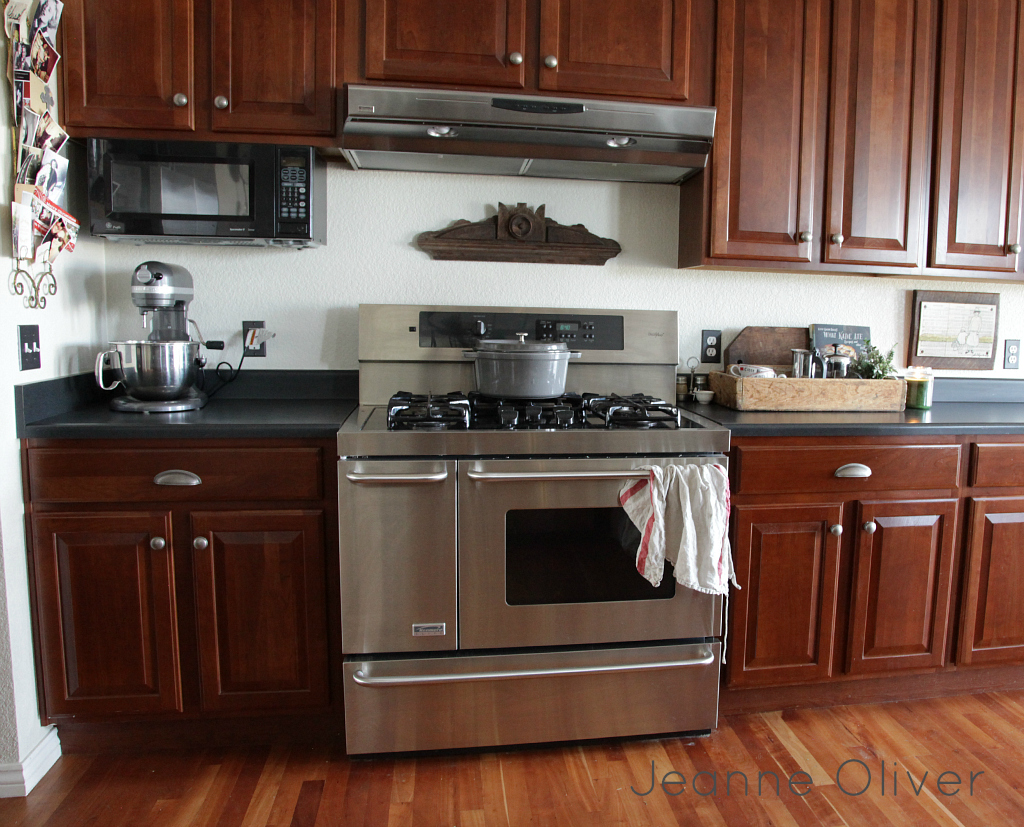
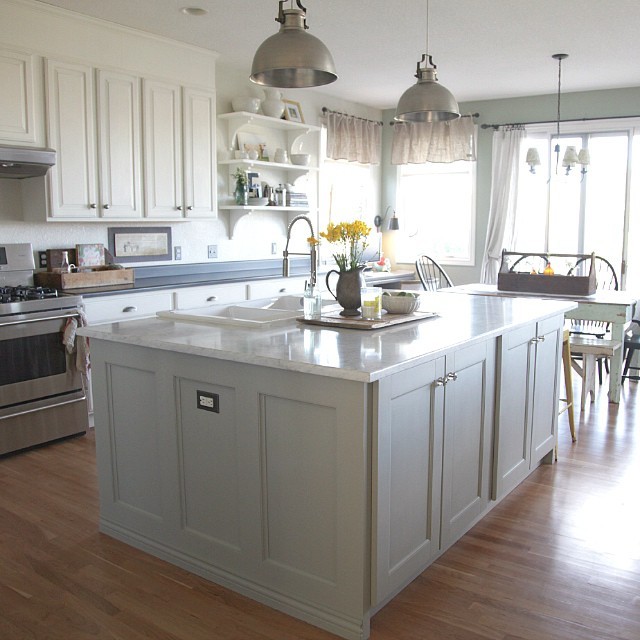
Would I do it again? In a heartbeat! It transformed our kitchen! Our home is so much brighter and now our whole house flows better. It was hard to convince my husband to paint over our expensive cherry. Keep in mind that we built this home and we both still remember how much of an upgrade the cherry cabinets were. If we ever get sick of the paint then you can strip them and do something different. It is just paint. Serious. Live a little!
I would be more than happy to answer any of your questions.
If you are interested in more posts about our kitchen remodel (and we still aren’t finished)…
Ikea Hack: How We Built our Kitchen Island
Kitchen Remodel Before and After
It’s absolutely gorgeous and like you I was a little bit nervous. But after reading this post, I’m going to go for it this spring!
I love it! Great job! You definitely give me inspiration. Thank you.
Thank you so much for this review!! I have read so many blog posts about painting kitchen cabinets and your totally gave me the confidence to just do it and get it done ASAP!!! Your cabinets look amazing!! One question. How many cans of ASCP did you use of each color and how many tins of wax?
I bought two cans of the wax but only used one and still have some left in that first can. Keep in mind that we still need to do a second coat.
I’m getting ready to do the same- we just bought a older home- I have used ASCP on about 6 pieces of furniture so far it’s a work out but so rewarding- my question to you about how many cans of paint did you use? Oh and your kitchen looks beautiful!
Around 4 cans.
How many cans of paint did you use? It looks awesome, I’m thinking about doing all our bathroom vanities!
I wish I could remember exactly but I bought way more than I needed. I think I spent $600 for everything and the quotes coming to be to paint the cabinets were around $3500. I bet I bought almost $200 too much of paint and wax. I didn’t want to run out while they were closed over the weekend and just over bought because I didn’t trust them that I had enough:-) I think about 4 cans.
Your kitchen is so pretty and the cabinets are beautiful. I would have never taken on this kind of challenge — impressed once again with your ambition!!
I appreciate this more than you can know…but then again..you probably do! I am going to paint our kitchen cabinets and all of this is helpful. we too built our own home and can do a lot of things ourselves. BUT, when you mentioned from the get go about contractors, not getting back to you. Well, wow, we think it’s an epidemic and don’t understand it ONE IOTA. Just one example, we got a phone call returned a few days ago, that this man could deliver a 1/2 ton of dirt for us. My husband asked him how come he was calling us NOW, about 3 weeks later. and that we already had it done. He said, oh you know…my husband said, no, not really. and my husband added that he prefers using local business’ and that we hired someone FAR AND AWAY, who called us back immediately and followed through.
I have to add, that my husband told the man we hired about no one calling us back. He shook his head and said, I just don’t understand, I keep hearing that and it’s not like business is booming ANYWHERE. Thank you immensely Jeanne once again. 😉
oh GOSH, I forgot to say that your kitchen is DIVINELY PAINTED and GORGEOUS!
I have used this paint on furniture and love, love, love it! Please share with us how you use the wax in your art! I think I need to start a new journal – Things I learned from jeanne Oliver and the friends she has introduced to me!
HA! I don’t know if it is correct and good to do but I have sealed paintings with the clear wax and then buffed it.
I also have painted my very old kitchen cupboards with Anne Sloan Chalk paint. I used Old White but only did two coats of paint (was told two should do it). I then distressed along edges with sandpaper and waxed using a combination of clear and dark wax (3 clear to 1 dark ratio – try different ratios depending on preference). Just lightly buffed a day or two later. I did the island in Greek Blue using only dark wax. I then put all new chrome hinges and handles on. What a difference it makes, lightens the house up (open concept older home with small rooms). If some of my waxing looked too dark I did not strip wax off but just painted over it and reapplied the wax; worked great. I am not the best painter as I have arthritis in my hands, especially thumb area but still think it turned out good (a whole lot better then it did before). And yes I would use ASCP again and have, on many of my old pieces of furniture, even old rusty metal table legs. Am painting a bedside table with Barcelona Orange now. Also using Old White on an old kitchen cupboard with glass doors, repositioning handles and adding legs to use as a storage cupboard in my small bathroom. Would post pictures but am not good at adding pictures on computer and attaching them yet.
I don’t know if you know that you don’t have to remove Annie Sloan Wax, to can paint over it it with Annie Sloan paint, you can save your self some work ????
Great to know! Thanks!
I painted my cabinets Annie Sloan in our last house and this one. The old ones held up but this one several of the doors flaked off and had to be redone after putting Kilzs on. There must have been something on them though they looked just like the others. I would reccomd a coat of white Kilzs first as a precaution.
I can see with some finishes that this would be smart.
Well, that just about cinches it – I won’t be painting the cabinets in a week… So many other projects to do that I may just break down and have new cabinet faces made!
You kitchen, however, is gorgeous! I can understand the fear of painting those beautiful cherry cabinets, though. well done, in the end!
I did everything in four days. It was a lot of work but worth it.
Did you also do the insides of the cabinets? To me that would be the hardest part.
I painted the inside of the doors and the fronts of the shelves.
Jeanne your kitchen looks fantastic! I have painted my kitchen cabinets and many pieces of furniture with Annie Sloan chalk paint. I also teach classes on how to use the product and do different finishes for a stockist in Wisconsin. I thought I would add some comments and maybe clear up any questions.
You should definitely wash down everything very well with a grease cutter, I recemmend Dawn dish soap. Do not use TSP, we have heard of problems with the paint flaking off. Although you don’t have to technically sand first, ASPC does stick to just about anything, it never hurts to do a light sand with a 220 grit sandpaper. I always recommend at least 2 coats of paint, more if you are doing a lighter color over dark cabinets. If you lightly sand after your second coat and then again after the last coat, the finish will be nice and smooth. If you use a 600 grit or higher sandpaper you will get a glasslike smooth finish. Do any distressing before you wax. I always recommend doing 2 to 3 coats of wax on kitchen or bathroom cabinets. Wait 24 hours between each coat of wax and then buff 24 hours after your last coat. Use either the wax brush or ripple cloth (medical grade gauze) to apply the wax. Apply in a circular motion then wipe in the direction you painted. The biggest problem people have with the wax is they apply too much. As you are putting it on do a finger swipe over the area, if you can see the swipe you have too much on. Think of it as putting on lotion. You want to feel it but don’t want your hands to be sticky. It is always better to put on 2 lighter coats then 1 heavy coat. Use a lint free cloth, I use the ripple cloth, to buff. If you are going to use the dark wax I always recommend putting a light coat of the clear wax on first and then immediately put on the dark wax. The clear wax creates a barrier so that the paint doesn’t absorb the pigment in the dark wax so quickly.
Mineral spirits will liquefy the wax. If you feel you have put too much on, especially the dark wax, then wipe your piece down with mineral spirits. It is best NOT to repaint over the wax. Again we have heard reports of the paint peeling off over time. If you want to fix something or change the color you can wipe your piece with mineral spirits and then sand the wax off.
You can water the paint down (I never do) but only use distilled water. There are no preservatives in the paint so if you use tap water it will grow mold. You can also mix the paint into the wax and create a colored wax.
I always tell people to remember that this will not be a manufacture quality finish or that it will not look like it was sprayed. That is the beauty of ASPC. There is nothing like the look and feel of something that is hand painted and waxed. Go for it and don’t be scared as you will definitely pay at least $3500 for someone else to do it. BUT, take your time and follow all the steps especially on your kitchen cabinets!
I would also highly recommend that you use the Annie Sloan brush. In my experience the job goes much quicker and the paint lays down much smoother. If you have a stockist near you that teaches classes I would also suggest taking one. My students always tell me how happy they are that they bit the bullet and took a class. You will learn so much.
Hopefully this info helps clear up any questions or worries. Good luck with your projects and have fun!
I’ve painted about 3 dozen kitchens and we usually do a 3 step clean on Kitchen Cabinets because of all the grease and gunk
1. Mineral Spirits with a scrubby to clean up things like pledge or cabinet magic or silicone based cleaners- it also knocks down the shine of the sealers.
2. Krud Kutter
3. Vinegar and Water to clean off all the suds and residue. If the cabinets are still shiny we might use Denatured Alcohol. This might be why the gal above had flaking, silicone cleaners or grease— if that happens, just sand that spot and paint it. The paint patches just beautifully.
Another tip is to run a sanding block of 220 sand paper over everything before you seal. It knocks down brush strokes and makes it all smooth- especially if you like a more modern finish. The paint can be sprayed, we do it all the time. We roll the paint on the cabinets and back brush. We spray the doors. But we always do a light sand over the paint with 220/320 before we seal. It gives it a beautiful professional look.
And the wax is VERY durable if applied properly- not too much. Not sticky after applying (I have a heavy hand so I use a blue paper towel and wipe excess off behind me). Then Buff! Annie uses the example of applying hand lotion when talking about how much wax to apply- when you have too much on your hands you just wipe it off, if your hands are still dry then you apply a bit more. 2 coats should be all you ever need. Also, if the dark wax is used and too dark you can apply some clear over it to act like an eraser. It’s because of the mineral spirits in the wax (the solvent) that softens the previous coat.
And I love to use 0000 Steel Wool to buff – especially the darker wax. I think the friction causes the blotchiness to soften.
If you have any questions- don’t hesitate to contact me. But buy your paint from your local stockist! LOL
If you have the time to read through the FAQ at Annie Sloan Unfolded- It is really good information.
What kind of sprayer do you use Annette? We have tried at the shop but did not have good results. I did a lot of research and came to the conclusion that the paint would have to be watered down so much it would negate the coverage. I’m curious to know how you do it, sometimes my students ask me about spraying.
Thanks
So I took the plunge and bought ASPC (Old Ochre) and I painted my laundry room cabinets this weekend after I added molding to the front!! All I have to say is….I had a saw it it was empowering…hehehehe!! I painted my cabinets with two coats. My question is….now what?? Do I clear wax and distress the edges? Do I do I distress the edges and then wax? Then when exactly do I use the dark wax? With the dark wax I have seen people use steel wool and the place I bought the paint told me to use ripple cloth??? I have seen many many many YouTube videos and I am a little lost! What is my next step? Distress? Clear wax? Dark Wax?
Go through my comments on this post because an Annie Sloan teacher shared her own step by step and it was really good.
My instructions are posted above and Annette has shared her experience also. I recommend to my students to distress before you put any wax on. Annie Sloan likes to wax first then distress. It is so much easier to distress first though, once the wax is on you have to put much more elbow grease into it. It also allows you to repaint if you distress too much. I don’t recommend using steel wool at all, it can change the color sometimes. Use the ripple cloth to both apply the wax and to buff it 24 hours later. I address the dark wax in my previous comment.
Good Luck!
I LOVE the look of your cabinets, perfect. I just took on this task to paint my kitchen cabinets. They are true oak I am told but a whitewashed look. I cleaned them, now have done two coats of ASCP pure white on the frames and a few doors to test it out. Truly, i see many brush strokes. I am AS brush and Purdy. Then I also tried rollers, every kind. This is completely overwhelming and I am not seeing a smooth surface. True the look is not mean to be smooth. So I decided okay let’s go with this look. The AS Wax is very tedious and time consuming but so I decided to get Minwax Polyacrylic water based protective finish. This started to yellow the cabinets. Here is what I did tonight. Decided to keep the AS base as a primer so to speak since it does catch onto the wood very well and covers. I was going to do my last coat with Benjamin Moore Advanced paint but the stores are not close by. Just came from Sherwin Williams and had them put three types of interior paint used for trim, doors etc. They put over the ASCP pure white cabinet door matte finish, satin and semi gloss. Waiting to see the result as this paint does leveling and a bit smoother finish. Also using this paint as a topcoat means I do not have seal over with Polyacrylic.
Your blog is the exact same, word for word, as a few other bloggers on this same subject. What do y’all do, just cut and paste? Even pictures? Who are we to believe?
Well, the photos are of our home so I am assuming you are seeing our words cut and pasted other places.
Jeanne, saw your post. A furniture second hand store only used ASP, after using othets. So, my question is I was thinking of doing my upper or lower cabinets. See a lot of that in current cabinet magazines. I wanted to know if Grease Lightening grease remover was ok to use. I will ask at AS paint store. ,but I feel it does a better job at removing grease, do you rinse off with water till clear. Second question. Do you sand between coats, Did not hear you say this step.
Last, if you have an area that does not take or stick, is Kiltz, the only product to use, there is another major brand, and some one told me about Stick-it, to bond the cabinet so paint will stick to it. I am also considering AS paint for woodwork that is 60 years old and a darker finish. Just don’t know if need a Kilt or a stick it product. The trim
has a poli urethane finish so thinking may need a base coat for trim.. And since I have a med to light oak cabinet would I need the 4 coats? I do not think so.
Thanks for your response!
I’m getting ready to do mine…my question is all these have used wax? I really want to use polycrylic. (All my friends used the poly) what is the pro/con of wax vs poly? I have big dogs that slobber lol so I used the poly in my bathroom & it’s perfect with them shaking water everywhere…just concerned the wax would spot?
What about brush strokes? Do they go away after applying wax or you just get used to them?
Brushstrokes are definitely part of the package with chalk paint. It only works with certain home styles for sure.
How is the wax holding up? Do you think the lacquer would hold up better in the long term?
We no longer live in that home but from what I understand it is good.
Hi! I just found this blog in an attempt to convince my husband we can do it ourselves!
His biggest concern is the white color (what shade). We have a very icy-white (almost blue doors) everywhere.. like hallway closet etc. And on our walls we have Simply White by Benjamin Moore. anyways, he says to introduce ANOTHER white color, might be weird. I want something pretty neutral. what would you recommend??
A good compromise is to make the island a color while leaving the other cabinets white.
You gave me inspiration to doing my kitchen. I’m very new at this and only recently did my first piece. Thank you for taking the time to share with us.
Andrea 🌺🇨🇦
Hi, this is a really interesting post and very informative. We are about to tackle our kitchen, well, “we aren’t” we are getting someone who specialises in ASCP to do it. Interestingly he recommends using AS gloss lacquer to finish rather than wax stating that it is more heat resistant and harder wearing. Would you agree or not, have you used a lacquer finish. Would love your views.
Steve
I think it matters the look you are going for. I didn’t want shiny and the wax was softer and felt more natural. Just go with your gut in what final look you want. It will be great. Just don’t be talked into a look one way or another that you have to live with.
I love the chalk paint on this. Not a huge fan of painting cabinets otherwise… but this is a great idea!